Discuss, comment, and ask questions. You can also log in and send a private message to jcasman.
This is an unofficial, community-generated guide to using the RICOH THETA S API. This is not authorized by RICOH and is based on publicly available information.
| THETA API v2.1 was recently released. This guide focuses on API v2.0. There are significant differences. I will update this guide for API v2.1. In the meantime, v2.0 still works. |
1. Quickstart
1.1. Connect Computer to THETA S
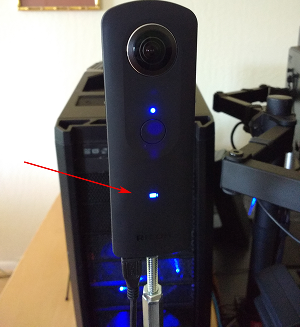
Turn on the THETA S. The WiFi icon will flash blue.
On your computer connect to the THETA access point that the camera created. The password is the serial number
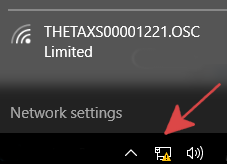
On Windows 10, the network can be changed from the connection
icon in the lower right-hand corner. If you are using WiFi for
Internet access, you will lose Internet access. The camera
is at IP 192.168.1.1. This subnet may interfere with your
network access even if you have multiple network adapters. If this happens
and you can’t reach the THETA, disable all other network adapters.
On Windows 10, running ipconfig will show your configured network
adapters.

Your Wireless LAN must be in the subnet 192.168.1.x. The Default Gateway
must be 192.168.1.1. The gateway is the THETA S.
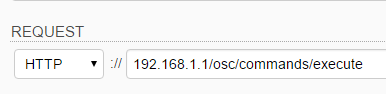
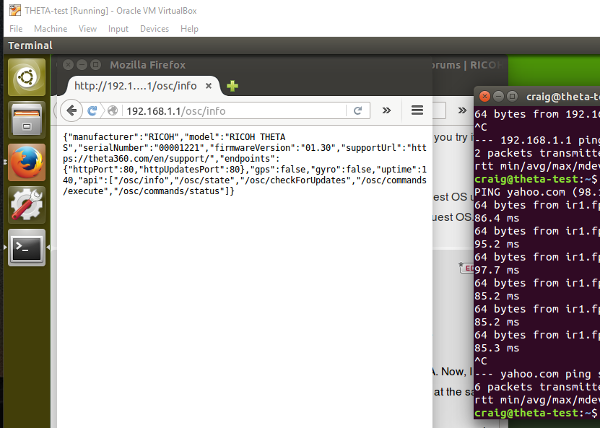
After establishing a wifi connection, please open a browser and access:
http://192.168.1.1/osc/info
The response:
  {"manufacture":"RICOH",
    "model":"RICOH THETA S",
    "serialNumber":"00001054",
    "firmwareVersion":"01.00",
    "supportUrl":"https://theta360.com/en/support/",
    "endpoints":{
      ... THERE WILL BE MORE INFO
1.2. Test Commands From Computer to Camera
You can use any HTTP tool to test POST and GET commands to the camera.
Many people use
curl, a web browser, or
Postman. In this example, I
am using
DHC by Restlet.
It is available for free as a Chrome Extension.
1.2.1. Using DHC - Free HTTP Testing Tool

After you install DHC as a Chrome Extension, set up a new post command as shown below.

Results:
  {
    "name": "camera.startSession",
    "state": "done",
    "results":{
      "sessionId": "SID_0001",
      "timeout": 180
    }
  }
Send a POST command to /osc/state.
  {
    "fingerprint": "FIG_0001",
    "state":{
      "sessionId": "SID_0000",
      "batteryLevel": 1,
      "storageChanged": false,
      "_captureStatus": "idle",
      "_recordedTime": 0,
      "_recordableTime": 0,
      "_latestFileUri": "",
      "_batteryState": "charged"
    }
}| I have the camera plugged into a standalone charger capable supplying 1.5 amps. The camera won’t connect with WiFi when plugged into the USB port of most computers. |
1.3. Taking Pictures
Start the session.
  192.168.1.1/osc/commands/execute

  {
    "name": "camera.startSession",
    "parameters": {}
  }
Grab the sessionId and take the picture.
  {
    "name": "camera.takePicture",
    "parameters": {
            "sessionId": "SID_0001"
    }
  }
The camera will beep.
1.4. Downloading the Image To Your Computer
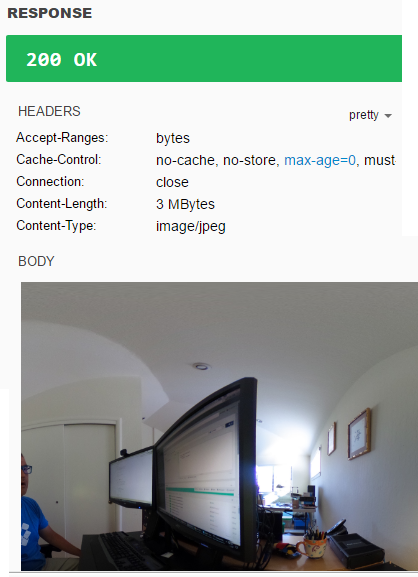
To test whether you’ve saved the image and to get the great satisfaction of seeing your image, you can grab the image with the API or with the mobile app.
If you use the API, the image is returned as a binary stream. Depending on your application or testing tool, you may need to convert it into a file. In DHC, the binary stream image is automatically converted into a viewable JPEG.
The first step to download the image is to get the image URI.
Use the camera._listAll command to see a listing of files with the URI.
There are two OSC (WiFi) API versions, v2.0 and v2.1.
The _listAll command in v2.0 is being replaced with listFiles.
I have not managed to get listFiles to work yet.
|
{
    "name": "camera._listAll",
    "parameters": {
    	"entryCount": 3
    }
}
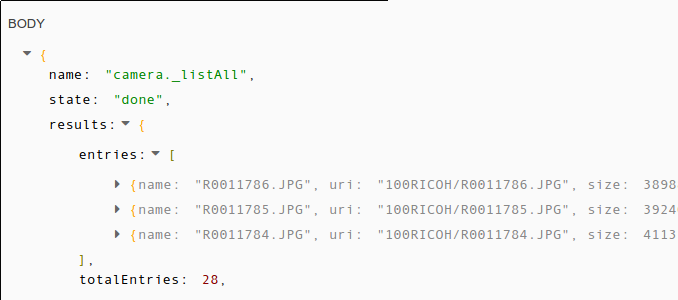
Use the URI in the POST parameters for getImage. In this example, the URI is
100RICOH/R0011788.JPG.
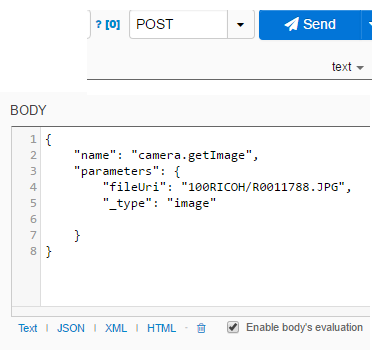
You will see the equirectangular image in the response.
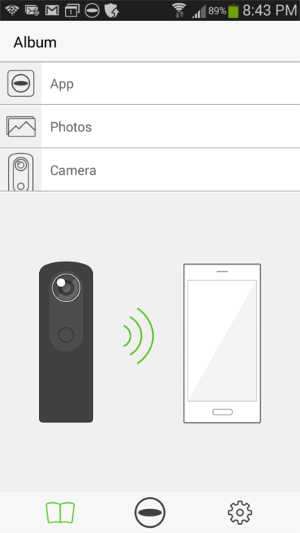
If you want to see the image with navigation, open the image with your phone using the THETA S app.
First disconnect your computer from the THETA S WiFi hotspot, then connect the phone to the camera.
| The THETA S can only connect to one wireless device at a time. You can connect your laptop or your phone, but not both at the same time. |
Select Camera.
Select the thumbnail.
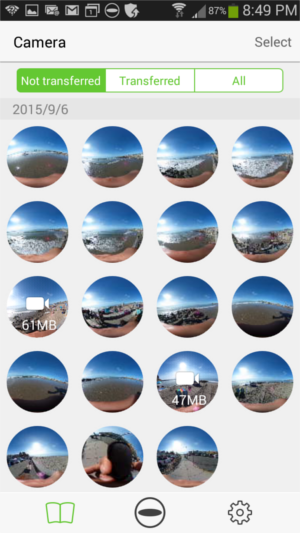
The image can be rotated.
1.5. Save Tests With a HTTP Browser Tool
| For easier testing, save the individual commands into your testing tool. |
In this example, I’ve saved it into DHC by Restlet.
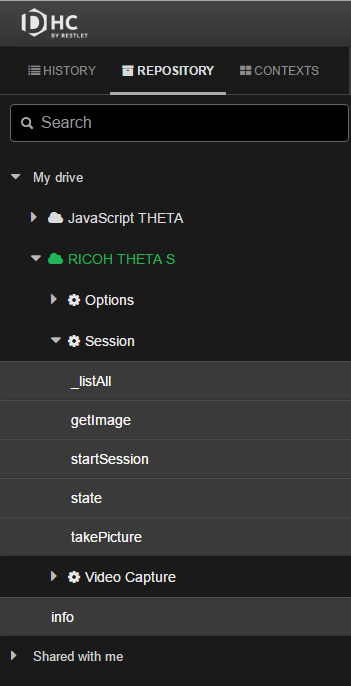
With this type of free tool, you can quickly test individual commands and see the results prior to running your program or test script. If you create a free account with DHC, you can save the commands in the cloud and run your tests from any Chrome browser on any computer.
2. Basic Apps
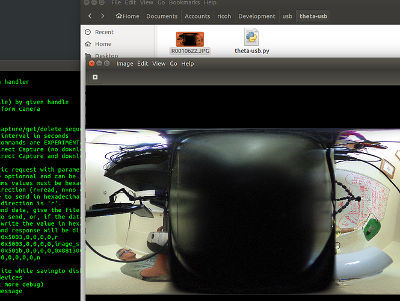
I used Python and JavaScript with node to test the API. If you use JavaScript, browser code can’t access the camera directly due to security restrictions.
2.1. Python
Sample code is available on GitHub. Additional Python examples are also available from the community. A better OSC Python library is available from Haarm-Pieter Duiker. Ulrich Rossgoderer wrote an example to download media from the command line.
I am using the Python requests
library for HTTP requests. While you can use
urllib2,
requests is easier for mere mortals. Although I’m doing the testing
on Windows 10, I am running the python scripts in a VirtualBox VM with default
NAT network settings. The Python program is able to connect from the VM through
the Windows 10 WiFi adapter and to the THETA S. I’m assuming that Python
will work fine on Windows 10, but it’s easier for me to use Linux.
To test with Python, I first started by simply writing out individual commands in the script, similar to browser testing. I then moved the THETA API v2 commands into a library and wrote a command line tool to accept arguments and test each command.
The first step to learn the API is to grab some basic information from the camera and print it to your console.
  1
2
3
4
5
6
7
8
9
10
11
12
13
14
15
16
17
18
19
20
21
22
23
24
25
26

  import requests, json, pprint

def request(url_request):
    url_base = "http://192.168.1.1/osc/" (1)
    url = url_base + url_request
    return url

def basic_info():
    protocols = [
        "state",
        "info"
    ]
    for protocol in protocols:
        print(60 * "=")
        print(protocol + " - Testing RICOH THETA API v2\n")
        url = request(protocol)
        if protocol == "info":
            req = requests.get(url)
        else:
            req = requests.post(url)
        pprint.pprint(req.json())

def main():
  basic_info()

main()
| 1 | The IP address of the camera is always 192.168.1.1 |
This is what I get:
  ricoh@odapolis:~/Development/viewer$ python theta-python-test.py
  ============================================================
  state - Testing RICOH THETA API v2

  {u'fingerprint': u'FIG_0002',
   u'state': {u'_batteryState': u'disconnect',
              u'_captureStatus': u'idle',
              u'_latestFileUri': u'',
              u'_recordableTime': 0,
              u'_recordedTime': 0,
              u'batteryLevel': 0.67,
              u'sessionId': u'SID_0028',
              u'storageChanged': False}}
  ============================================================
  info - Testing RICOH THETA API v2

  {u'api': [u'/osc/info',
            u'/osc/state',
            u'/osc/checkForUpdates',
            u'/osc/commands/execute',
            u'/osc/commands/status'],
   u'endpoints': {u'httpPort': 80, u'httpUpdatesPort': 80},
   u'firmwareVersion': u'01.11',
   u'gps': False,
   u'gyro': False,
   u'manufacturer': u'RICOH',
   u'model': u'RICOH THETA S',
   u'serialNumber': u'00001221',
   u'supportUrl': u'https://theta360.com/en/support/',
   u'uptime': 3081}
Now, we want to take a picture. We’ll take a still image in this example, but it’s almost as easy to start a video capture and end it.
First you need to start a session and grab the session ID (SID).
  1
2
3
4
5
6
7
8
9
10
11
12
13
14


  def startSession():
      url = request("commands/execute")
      body = json.dumps({"name": "camera.startSession",
           "parameters": {}
           })
      req = requests.post(url, data=body)
      response = req.json()
      print(60 * "=")
      print("startSession - Testing RICOH THETA API v2\n")
      pprint.pprint(response)
      sid = (response["results"]["sessionId"])
      print sid
      return sid
At this point I still think it’s cool, to output the response to the console.
Also, it will give you a better idea of how to pull the sessionId or
timeout values into your program. In the example above, I grab
the response from the request. I then get the results key from the
dictionary. The results value is another dictionary. I use the
key sessionId to grab the value I need to take a picture.
My main() function now looks like this:
  1
2
3
4
5
6
7
8
9
10
11
12

    def main():
      basic_info()
      sid = startSession() #grab session ID

The output of to the console looks like this:

  startSession - Testing RICOH THETA API v2

  {u'name': u'camera.startSession',
   u'results': {u'sessionId': u'SID_0029', u'timeout': 180},
   u'state': u'done'}
  SID_0029
Now, it’s the exciting part. We can take the picture!
  1
2
3
4
5
6
7
8
9
10
11
12

    def takePicture(sid):
      url = request("commands/execute")
      body = json.dumps({"name": "camera.takePicture",
           "parameters": {
              "sessionId": sid
           }
           })
      req = requests.post(url, data=body)
      response = req.json()
      print(60 * "=")
      print("takePicture - Testing RICOH THETA API v2\n")
      pprint.pprint(response)
Add the function to main().
  1
2
3
4

    def main():
      basic_info()
      sid = startSession() #grab session ID
      takePicture(sid) #still image
Run it and celebrate!
============================================================
takePicture - Testing RICOH THETA API v2
  {u'id': u'1',
   u'name': u'camera.takePicture',
   u'progress': {u'completion': 0.0},
   u'state': u'inProgress'}
In appendix, I included an easy example of an interface to access the Python library we’re building.
2.2. JavaScript
Normally, JavaScript within a web browser will not be able to access the THETA due to security restrictions. Use Node.js to communicate with the camera.
In addition to server-side applications, people have successfully built applications using Cordova and Titanium. At the DeveloperWeek Hackathon, Thuong Ho showed a nice example using Ionic and Browserify. Browserify lets you require('modules') in the browser by bundling up all of your dependencies. He used Ionic to get the AngularJS components in his mobile application and was able to take a picture and download the code using the Node.js example code below.
| Running JavaScript in a browser directly will result in an error when you access the camera. You must use something like Node.js or another way of running the code. |
Let’s start with the easiest example, Node.js, from the command line.
I downloaded Node.js for Windows.
Then, I followed a
blog post by Satoru Yamada who describes
how to
access the THETA camera with JavaScript.
After copying and pasting his code into a text editor,
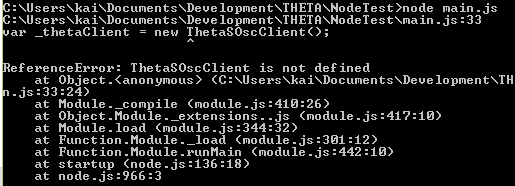
titling the program main.js and running it using the
node command prompt” I ran into a problem with the osc-client.
This was simply remedied by downloading the
osc-client using NPM.
npm install osc-client --save
| Use --save |
After installing osc-client, I tried running the program at
the command prompt again.
| Connect to the camera over WiFi first |
  1
2
3
4
5
6
7
8
9
10
11
12
13
14
15
16
17
18
19
20
21
22
23
24
25
26
27

    var fs = require('fs');
  var OscClientClass = require('osc-client').OscClient;

  var domain = '192.168.1.1';
  var port = '80';
  var client = new OscClientClass(domain, port);
  var sessionId;
  var filename;

  client.startSession().then(function(res){
    sessionId = res.body.results.sessionId;
    return client.takePicture(sessionId);
    })

  .then(function (res) {
    var pictureUri = res.body.results.fileUri;
    console.log('pictureUri :%s',pictureUri);

    var path = pictureUri.split('/');
    filename = path.pop();
    return client.getImage(pictureUri);
  })
  .then(function(res){
    var imgData = res.body;
    fs.writeFile(filename,imgData);
    return client.closeSession(sessionId);
  });
If everything goes well then the program will tell the camera to take a picture, then save the newly created picture in the directory where you executed the command. The file is immediately transferred to the computer.
| Organzing a github repository of JavaScript API examples |
If you want to take videos there is an additional package that needs to be installed. A community member has created an add on to the osc-client called osc-client-theta_s that allows video capture and download. His code is included in the same link.
I ran into a series of problems with his code. First I had to download a
series of modules (superagent, debug, qs, osc-client-theta_s)
using NPM (which can be found by simply typing in the “find packages”
search bar). Then ThetaSOscClient returned as undefined.
Even if you use the entire code sample for osc-client-theta_s that is available on GitLab, you will see this error.
Nate Levine got the node module working at the DeveloperWeek Hackathon where he was able to successfully take a video using the osc-client-theta_s module and download it to his local computer. He mentioned that the example code from horihoro doesn’t work. However, the module does work and his team won the THETA API hackathon prize at the hackathon. They took 2nd place overall out of 120 teams.
Here’s a code snippet portion related to 360 video download using node and the THETA S API. This is from Nate’s award-winning code. :-)
  1
2
3
4
5
6
7
8
9
10
11
12
13
14
15
16
17
18
19
20
21
22
23
24
25
26
27
28
29
30
31
32
33
34
35
36
37
38
39
40
41
42
43
44
45
46
47
48
49
50

    var fs = require('fs');
  var ThetaSOscClient = require('osc-client-theta_s').ThetaSOscClient;

  var domain = '192.168.1.1';
  var port = '80';
  var thetaClient = new ThetaSOscClient(domain, port);
  var sessionId;
  var fileName;

  thetaClient.startSession().then(function (res) {
    //Grab the session id
    sessionId = res.body.results.sessionId;
    return thetaClient.setOptions(sessionId, {captureMode:"_video"})
  })
  .then(function (res) {
    console.log('starting capture');
    return thetaClient.startCapture(sessionId);
  })
  .catch(function (error) {
    console.log(error);
  });

  // Stop capturing after a certain interval in ms
  var interval = 5000;

  setTimeout(function () {
    console.log('stopping capture');
    thetaClient.stopCapture(sessionId)
    .then(function (res) {
      console.log('stopped capture, writing file');
      return thetaClient.listAll({entryCount:1, sort:"newest"});
    })
    // Get the filename and most recently recorded video uri
    .then(function (res) {
      fileName = res.body.results.entries[0].name;
      console.log(fileName);
      return thetaClient.getVideo(res.body.results.entries[0].uri, "full");
    })
    // Write to disk
    .then(function (res) {
      fs.writeFile(fileName, res.body);
    })
    .then(function (err) {
      console.log('closing the session');
      return thetaClient.closeSession(sessionId);
    })
    .catch(function (error) {
      console.log(error);
    });
  }, interval);
2.3. Other Languages
Any language with that can send HTTP commands can be used to connect to the THETA S.
3. Small Hardware WiFi Control
3.1. Raspberry Pi
The Raspberry Pi works great with the RICOH THETA S API over WiFi and over USB.
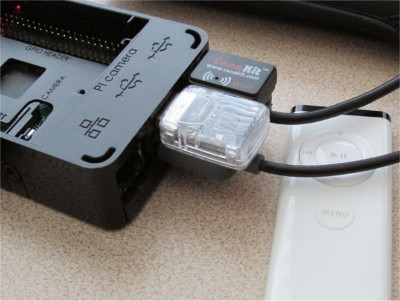
3.1.1. Using an IR Remote to Control the THETA S
In this example, I have it working with the FLIRC USB dongle to connect a simple IR remote to THETA S.

This examples opens up a range of possibilities for triggering pictures and video with motion, light, and other sensors connected to the Raspberry Pi.
Although the picture shows USB and an HDMI cable connected to the Raspberry Pi, you can remove the cables and connect the Raspberry Pi to a battery. The one in the link powered an Pi for 15 hours.
I have only tested the Pi with the remote control as a proof of concept to make sure it works. I tested taking a picture, starting a video, and stopping a video capture. The modifications only took 15 minutes, most of this time was spent fiddling with my WiFi routes since it was the first time I connected the Pi to the THETA S.
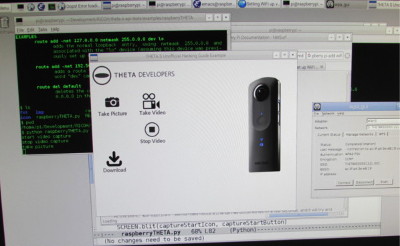
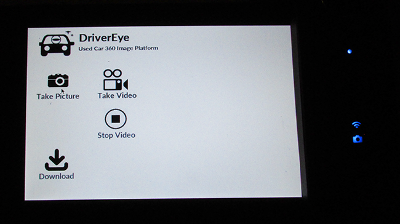
I have the same GUI displayed from my deskTHETA example. However, you don’t need a monitor connected to run the program. Right now, the GUI serves no purpose other than testing from the Pi to the THETA.
3.1.2. Screengrabs Over USB in Live Streaming Mode
The THETA S can be put into liveStreaming mode by holding down the bottom button and turning the power on while holding the button down.
Once in liveStreaming mode, you can grab images directly from the USB cable.
I used fswebcam to grab dual-fisheye shots and save it to the SD card
of the Raspberry Pi.
3.2. Other Hardware
Although you can run API commands over the USB cable, you can also use cheap boards that can handle a WiFi signal. The cheapest boards are based on the ESP8266, which sell for between $6 and $15. Most boards can be purchased for $10 and come with the microcontroller, WiFi components, and flash.
3.2.1. ESP8266
I’ve written a blog post with information on using the ESP8266.
Information:
-
SparkFun ESP8266 Thing One of the more expensive boards
4. USB Cable Control
Developers can access the RICOH THETA API over USB.
4.1. Advantages of API Over USB
-
The THETA can be left powered on indefinitely for applications such as surveillance, map creation or time-lapse photography
-
The files download much faster from the camera to the computer
-
There are no issues with WiFi signal strength or WiFi setup
4.2. Disadvantages of API Over USB
-
The PTP API (the USB one) is not as complete as the THETA API v2 (the WiFi one)
-
There are less people using the USB API
-
It’s harder to work with as you need to send it hex codes, not human-readable commands
-
We may find issues with the libraries for PTP access
If you choose to develop your application with the v2 USB API, you are a pioneer. Please contribute your experiences with the community.
4.3. Controlling the THETA from Raspberry Pi or Linux With USB
The community initially started connecting to the THETA from Windows with MTP Extensions and Raspberry Pi devices using libptp. As I am more familiar with Linux, I ran my tests on Ubuntu 16.04. I also know that people are using the same programs on the Raspberry Pi with Raspian OS (similar to Ubuntu or Debian).
As far as I know, the API works fine on Windows and the examples on the Microsoft site work.
| In the above example for Windows, change the Op Code to 0x100e and the StorageID |
This tutorial will focus on libptp, which I compiled from source.
I’ll document the installation of libptp in a future update. libptp
also installs ptpcam.
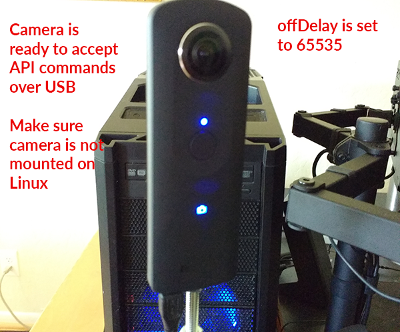
4.3.1. Preparing the Camera for USB Control
-
Camera is on, there is a blue light
-
Camera is connected with USB to Linux computer (camera is USB 2.0, but it’ll work on a USB 3.0 port)
-
Camera is not mounted as filesystem on your computer
| With $3 for common nuts and a bolt, you can attach the THETA to any tripod or attach to another machine for industrial use. Use 1/4 inch, 20 TPI parts |
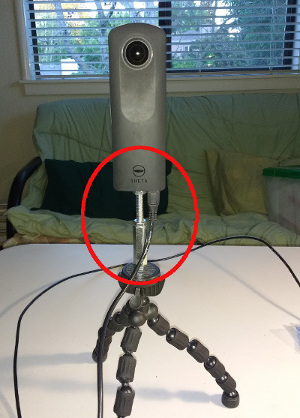
Here’s more information on building a camera attachment adapter that works with the USB cable plugged in.
4.3.2. Verify Computer finds Camera as USB Device
$ lsusb
Bus 003 Device 009: ID 05ca:0366 Ricoh Co., Ltd
4.3.3. Verify ptpcam Can Connect to Camera
First verify that ptpcam can connect to the camera.
$ ptpcam -i
Camera information
==================
Model: RICOH THETA S
  manufacturer: Ricoh Company, Ltd.
  serial number: '00010093'
  device version: 01.42
  extension ID: 0x00000006
  extension description: (null)
  extension version: 0x006e
Next, we’ll list all the operations that libptp can access on the camera over usb.
$ ptpcam -o
Listing supported operations...
Camera: RICOH THETA S
  0x1001: GetDeviceInfo
  0x1002: OpenSession
  0x1003: CloseSession
  0x1004: GetStorageIDs
  0x1005: GetStorageInfo
  0x1006: GetNumObjects
  0x1007: GetObjectHandles
  0x1008: GetObjectInfo
  0x1009: GetObject
  0x100a: GetThumb
  0x100b: DeleteObject
  0x1014: GetDevicePropDesc
  0x1015: GetDevicePropValue
  0x101b: GetPartialObject
  0x9001: UNKNOWN
  0x9991: UNKNOWN
  0x9999: UNKNOWN
  0x999a: UNKNOWN
  0x999b: UNKNOWN
  0x999c: UNKNOWN
  0x999d: UNKNOWN
  0x100e: InitiateCapture
  0x1016: SetDevicePropValue
  0x101c: InitiateOpenCapture
  0x1018: TerminateOpenCapture
  0x99a2: UNKNOWN
It’s looking very promising. Next, we’ll list the properties that can accessed.
4.4. Access Camera Properties Over USB
$ ptpcam -p
Listing properties...
Camera: RICOH THETA S
  0x5001: Battery Level
  0x5002: Functional Mode
  0x5003: Image Size
  0x5011: Date Time
  0x5012: Pre-Capture Delay
  0xd407: UNKNOWN
  0x5005: White Balance
  0x500e: Exposure Program Mode
  0x500f: Exposure Index (film speed ISO)
  0x5010: Exposure Bias Compensation
  0x5013: Still Capture Mode
  0x501a: Timelapse Number
  0x501b: Timelapse Interval
  0x502c: UNKNOWN
  ....
Let’s check if I have a good battery charge.
$ ptpcam --show-property=0x5001
Camera: RICOH THETA S
'Battery Level' is set to: 100
It’s plugged into USB, so it makes sense that my battery is at 100%.
Next, I’ll check the image size:
$ ptpcam --show-property=0x5003
Camera: RICOH THETA S
'Image Size' is set to: "5376x2688"
I’ll check the time:
$ ptpcam --show-property=0x5011
Camera: RICOH THETA S
'Date Time' is set to: "20160701T142845-0700"
Check Capture Mode
$ ptpcam --show-property=0x5013
Camera: RICOH THETA S
'Still Capture Mode' is set to: [Normal]
Set Capture Mode to Video
Using the RICOH v2 USB documentation, you can find that video shooting corresponds to 0x8002.
$ ptpcam --set-property=0x5013 --val=0x8002
Camera: RICOH THETA S
'Still Capture Mode' is set to: [Normal]
Changing property value to 0x8002 [(null)] succeeded.
Verify that the change was saved:
$ ptpcam --show-property=0x5013
Camera: RICOH THETA S
'Still Capture Mode' is set to: 0x8002 (-32766)
The blue light on the THETA now shows a video icon.
At this stage, I boiled a pot of tea and left the camera on. When I came back, it had turned off.
I verified that the battery was still at 100%.
$ ptpcam --show-property=0x5013
Camera: RICOH THETA S
'Still Capture Mode' is set to: 0x8002 (-32766)
craig@linux-silver:~$ ptpcam --show-property=0x5001
Camera: RICOH THETA S
'Battery Level' is set to: 100
I then looked at the sleepDelay
$ ptpcam --show-property=0xd803
Camera: RICOH THETA S
'UNKNOWN' is set to: 600
The sleepDelay is set to 600 seconds, or 10 minutes. I’m going to disable it.
$ ptpcam --set-property=0xd803 --val=0
Camera: RICOH THETA S
'UNKNOWN' is set to: 600
Changing property value to 0 [(null)] succeeded.
Now, hopefully, the THETA will stay on indefinitely, powered by the USB and I’ll be able to use it in an industrial application such as security surveillance.
List the files on your THETA.
$ ptpcam -L
Listing files...
Camera: RICOH THETA S
Handler:           Size:     Captured:          name:
0x0064026e:      4000851    2016-06-03 21:11    R0010622.JPG
0x0064026f:      3953884    2016-06-09 22:52    R0010623.JPG
0x00640270:      3923907    2016-06-10 00:22    R0010624.JPG
Download the first file from the camera to your local computer.
$ ptpcam --get-file=0x0064026e
Camera: RICOH THETA S
Saving file: "R0010622.JPG" is done.
Boom! It’s super fast.
You can look at the image in your Linux file browser just to verify that the image was downloaded. In this picture, I have the THETA lying on it’s side on my desk.
It’s not a very nice picture, so I’ll delete it.
$ ptpcam --delete-object=0x0064026e
Object 0x0064026e (R0010622.JPG) deleted.
I’m going to take another shot with my camera in a tripod. First, I’ll set the mode to still image as I set it to video earlier.
$ ptpcam --set-property=0x5013 --val=0x0001
Camera: RICOH THETA S
'Still Capture Mode' is set to: 0x8002 (-32766)
Changing property value to 0x0001 [(null)] succeeded.
Then, I take the image.
$ ptpcam -c
Initiating captue...
List the files on the camera:
$ ptpcam -L
Listing files...
Camera: RICOH THETA S
Handler:           Size:     Captured:          name:
....
0x0064027e:      3930938    2016-07-01 23:22    R0010638.JPG
Download the file to my local computer
$ ptpcam --get-file=0x0064027e
Camera: RICOH THETA S
Saving file: "R0010638.JPG" is done.
Verify that the download worked.
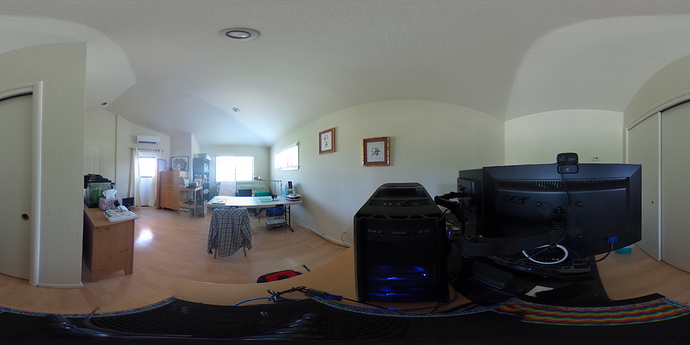
You can now see my boss Antec case for my overclocked system and the top of my overclocked and watercooled Linux test rig decorated with rainbow tape by my daughter.
I then checked the battery to verify that the THETA can last indefinitely connected with USB:
$ ptpcam --show-property=0x5001
Camera: RICOH THETA S
'Battery Level' is set to: 100
Wait! The camera just turned off. I’m going to connect with the WiFi USB to set the offDelay.
| I have two network interfaces in my computer, I can access the THETA over WiFi while I am connected to the Internet. |
| I use DHC to easily set the options. DHC is a tool to send, save, and organize HTTP requests. As I test the THETA frequently. |
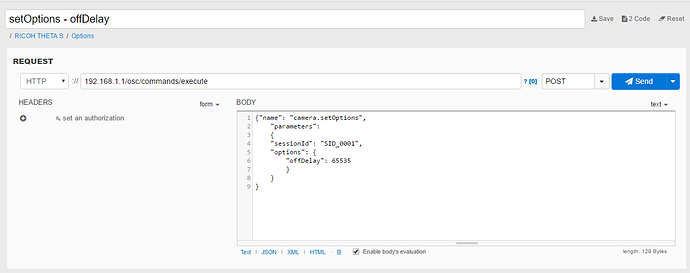
If the image is difficult to see, the relevant POST body is
{"name": "camera.setOptions",
    "parameters":
	{
    "sessionId": "SID_0001",
    "options": {
		"offDelay": 65535
    	}
	}
}
You can check the offDelay parameter with this:
{"name": "camera.getOptions",
    "parameters":
	{
    	"sessionId": "SID_0001",
    	"optionNames": [
            "offDelay"
    	]
	}
}
Again, I have this template saved in DHC, so it’s easy for me to just change the optionNames.
I’m hopeful that the THETA will now stay on forever. At this point, it’s been on for several hours and I can send it API commands. So, it’s in a good state for surveillance or mapping. I think I can leave it on for days. I just checked the battery again after leaving the camera on for hours.
$ ptpcam --show-property=5001
Camera: RICOH THETA S
'Battery Level' is set to: 100
Bring on the industrial applications!
4.5. Using Raw PTP Commands
Your program may have to use raw PTP commands. It’s almost the same as the examples above. I’ll include some examples using raw PTP.
4.5.1. Grabbing Info
Pass the raw PTP command of GetDeviceInfo as a hex string, 0x1001
My gosh, this looks horrible. What does it mean? Oh wait, there’s some human-readable text in the right-hand column next to the hex dump.
craig@linux-silver:$ ptpcam -R 0x1001
Camera: RICOH THETA S
Sending generic request: reqCode=0x1001, params=[0x00000000,0x00000000,0x00000000,0x00000000,0x00000000]
64 00 06 00 00 00 6e 00 00 01 80 1a 00 00 00 01 - d.....n.........
10 02 10 03 10 04 10 05 10 06 10 07 10 08 10 09 - ................
10 0a 10 0b 10 14 10 15 10 1b 10 01 90 91 99 99 - ................
99 9a 99 9b 99 9c 99 9d 99 0e 10 16 10 1c 10 18 - ................
10 a2 99 06 00 00 00 02 40 06 40 08 40 0a 40 0c - ........@.@.@.@.
40 0d 40 1d 00 00 00 01 50 02 50 03 50 11 50 12 - @.@.....P.P.P.P.
50 07 d4 05 50 0e 50 0f 50 10 50 13 50 1a 50 1b - P...P.P.P.P.P.P.
50 2c 50 06 d0 0f d0 01 d8 02 d8 03 d8 05 d8 06 - P,P.............
d8 07 d8 08 d8 09 d8 0a d8 0b d8 0c d8 0d d8 0e - ................
d8 00 00 00 00 04 00 00 00 01 30 01 38 02 b8 82 - ..........0.8...
b9 14 52 00 69 00 63 00 6f 00 68 00 20 00 43 00 - ..R.i.c.o.h. .C.
6f 00 6d 00 70 00 61 00 6e 00 79 00 2c 00 20 00 - o.m.p.a.n.y.,. .
4c 00 74 00 64 00 2e 00 00 00 0e 52 00 49 00 43 - L.t.d......R.I.C
00 4f 00 48 00 20 00 54 00 48 00 45 00 54 00 41 - .O.H. .T.H.E.T.A
00 20 00 53 00 00 00 06 30 00 31 00 2e 00 34 00 - . .S....0.1...4.
32 00 00 00 09 30 00 30 00 30 00 31 00 30 00 30 - 2....0.0.0.1.0.0
00 39 00 33 00 00 00 00                         - .9.3....
PTP: response OK
Well, at least I know it works. Though, it’s a little daunting that the responses are in hex. I’m going to power through!
4.5.2. Checking Battery Status
0x1015 is GetDevicePropValue. The property battery is 0x5001.
The result is a number between 0 and 100. Hmm, 64. That doesn’t correspond
to 100%. Ahh, it’s in hex. :-(
64 in hex corresponds to a decimal value of 100. My battery charge is 100%. It’s connected with USB, it’s always 100% :-)
craig@linux-silver:$ ptpcam -R 0x1015,0x5001
Camera: RICOH THETA S
Sending generic request: reqCode=0x1015, params=[0x00005001,0x00000000,0x00000000,0x00000000,0x00000000]
64 00 00 00 00 00 00 00 00 00 00 00 00 00 00 00 - d...............
00 00 00 00 00 00 00 00 00 00 00 00 00 00 00 00 - ................
00 00 00 00 00 00 00 00                         - ........
PTP: response OK
Wow, I can only imagine dealing with the response codes in C. If the connection wasn’t so fast and so stable, it would be too much to put up with.
However, the more I look at this, the hex dump is starting to grow on me.
4.5.3. Getting Size of Still Image
In this example, I look for the property ImageSize which is 0x5003. Just to refresh from the previous example, 0x1015 is GetDevicePropValue. In the right column, you can see that the image size is 5376x2688
craig@linux-silver:$ ptpcam -R 0x1015,0x5003
Camera: RICOH THETA S
Sending generic request: reqCode=0x1015, params=[0x00005003,0x00000000,0x00000000,0x00000000,0x00000000]
0a 35 00 33 00 37 00 36 00 78 00 32 00 36 00 38 - .5.3.7.6.x.2.6.8
00 38 00 00 00 00 00 00 00 00 00 00 00 00 00 00 - .8..............
00 00 00 00 00 00 00 00                         - ........
PTP: response OK
4.5.4. Taking a Picture
I can take a picture, but get a PTP: I/O error. This doesn’t appear to negatively impact taking a picture. I’ll take a look at this in the future. I think it may be caused by the delay that the THETA causes when it processes the image into equirectangular format.
$ ptpcam -R 0x100e
Camera: RICOH THETA S
Sending generic request: reqCode=0x100e, params=[0x00000000,0x00000000,0x00000000,0x00000000,0x00000000]
PTP: I/O error
4.5.5. Get Storage IDs
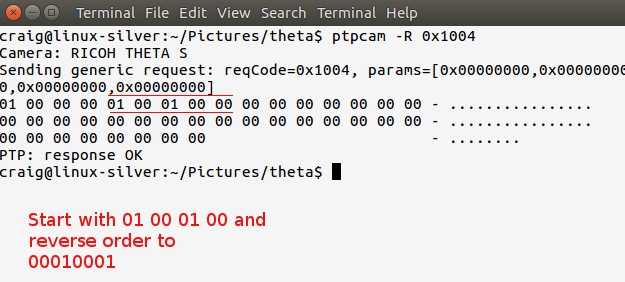
$ ptpcam -R 0x1004
Camera: RICOH THETA S
Sending generic request: reqCode=0x1004, params=[0x00000000,0x00000000,0x00000000,0x00000000,0x00000000]
01 00 00 00 01 00 01 00 00 00 00 00 00 00 00 00 - ................
00 00 00 00 00 00 00 00 00 00 00 00 00 00 00 00 - ................
00 00 00 00 00 00 00 00                         - ........
PTP: response OK
Wow, this was not pleasant to look at for the first few minutes. Eventually, I realized that the storage ID was reversed.
Focus on the numbers in places 5-8 and reverse the order.
4.5.6. Get Object Handles
$ ptpcam -R 0x1007,0x00010001
Camera: RICOH THETA S
Sending generic request: reqCode=0x1007, params=[0x00010001,0x00000000,0x00000000,0x00000000,0x00000000]
15 00 00 00 00 00 00 80 00 00 64 00 6f 02 64 00 - ..........d.o.d.
70 02 64 00 71 02 64 00 72 02 64 00 73 02 64 00 - p.d.q.d.r.d.s.d.
74 02 64 00 75 02 64 00 76 02 64 00 77 02 64 00 - t.d.u.d.v.d.w.d.
79 02 64 00 7a 02 64 00 7b 02 64 00 7c 02 64 00 - y.d.z.d.{.d.|.d.
7d 02 64 00 7e 02 64 00 7f 02 64 00 80 02 64 00 - }.d.~.d...d...d.
81 02 64 00 82 02 64 00                         - ..d...d.
PTP: response OK
$
You’ll need to reverse the order of each file handle to get information on it or download.
4.5.7. Get File Information From Camera
$ ptpcam -R 0x1008,0x00640282
Camera: RICOH THETA S
Sending generic request: reqCode=0x1008, params=[0x00640282,0x00000000,0x00000000,0x00000000,0x00000000]
01 00 01 00 01 38 00 00 76 1f 3c 00 08 38 72 0d - .....8..v.<..8r.
00 00 a0 00 00 00 78 00 00 00 00 15 00 00 80 0a - ......x.........
00 00 08 00 00 00 00 00 64 00 00 00 00 00 00 00 - ........d.......
00 00 00 00 0d 52 00 30 00 30 00 31 00 30 00 36 - .....R.0.0.1.0.6
00 34 00 32 00 2e 00 4a 00 50 00 47 00 00 00 10 - .4.2...J.P.G....
32 00 30 00 31 00 36 00 30 00 37 00 30 00 32 00 - 2.0.1.6.0.7.0.2.
54 00 30 00 37 00 30 00 38 00 33 00 33 00 00 00 - T.0.7.0.8.3.3...
10 32 00 30 00 31 00 36 00 30 00 37 00 30 00 32 - .2.0.1.6.0.7.0.2
00 54 00 30 00 37 00 30 00 38 00 33 00 33 00 00 - .T.0.7.0.8.3.3..
00 01 00 00 00 00 00 00                         - ........
PTP: response OK
4.5.8. Download File as Hexdump For Testing
File contents below have been edited so you can see the beginning and end of the file.
$ ptpcam -R 0x1009,0x00640282 > hexdump
$ less hexdump
Camera: RICOH THETA S
Sending generic request: reqCode=0x1009, params=[0x00640282,0x00000000,0x00000000,0x00000000,0x00000000]
ff d8 ff e1 f1 fe 45 78 69 66 00 00 4d 4d 00 2a - ......Exif..MM.*
00 00 00 08 00 0d 01 0e 00 02 00 00 00 40 00 00 - .............@..
00 aa 01 0f 00 02 00 00 00 16 00 00 00 ea 01 10 - ................
....
....
00 00 00 00 00 00 00 00 00 00 00 00 00 00 00 00 - ................
00 00 00 00 00 00 00 00 00 00 00 00 00 00 00 00 - ................
PTP: response OK
It’s possible to write a bit of code to parse the file and convert the hex
into JPG format. I decided to leave this one for someone else. I suspect
that another library may be a bit more friendly. The good news is that
it’s possible to download the image. The source code for ptpcam has
an example of how to download the binary file. Or, you can use
ptpcam --get-file=FILE_HANDLE within a script to download the image
as a JPEG file.
4.6. Windows MTP Extensions
To get the API to work over USB on Windows, you just have to issue “raw” MTP/PTP commands to get it to work. For people using Windows Portable Devices API to control the THETA S, keep this in mind:
It looks like you can’t use the WPD command
WPD_COMMAND_STILL_IMAGE_CAPTURE_INITIATE to initiate capture. If you use this
command the driver returns an error to you.
The correct way to do this is to use WPD_COMMAND_MTP_EXT_EXECUTE_COMMAND_WITHOUT_DATA_PHASE
and set up all the parameters and Op Code for image capture and then send that command. Take a look at
this example
from Microsoft for setting things up. Basically you just need to change the Op Code to
0x100E (for initiate capture) and change the StorageID to 0x0
(as documented in the Theta v2 USB API) and you are ready to go.
This information was originally contributed by Matt Wymore in the RICOH developer forum.
| Refer to Windows MTP Extensions documentation on the Microsoft site |
4.7. gphoto2 on Linux
gphoto2 partially works without modification. It may be useful for some
applications or you can potentially get it to work fully with a bit of effort.
As it has some use and can be installed with a simple apt install gphoto2,
I will include some information on it. It could also help with
troubleshooting.
gphoto2 automatically detected the THETA and correctly identified the BUS and PORT.
$ gphoto2 --auto-detect
Model                          Port
----------------------------------------------------------
USB PTP Class Camera           usb:003,009
It can list files on the THETA.
# gphoto2 -L -f /store_00010001/DCIM/100RICOH
There are 8 files in folder '/store_00010001/DCIM/100RICOH'.
#1     R0010622.JPG               rd  3908 KB 5376x2688 image/jpeg
#2     R0010623.JPG               rd  3862 KB 5376x2688 image/jpeg
#3     R0010624.JPG               rd  3832 KB 5376x2688 image/jpeg
Capture Image and Download also works
$ gphoto2 --capture-image-and-download
New file is in location /store_00010001/DCIM/100RICOH/R0010632.JPG on the camera
Saving file as R0010632.JPG
Deleting file /store_00010001/DCIM/100RICOH/R0010632.JPG on the camera
craig@linux-silver:~/Documents/tmp/img$
In addition to using gphoto2, I also tried the Python bindings for libgphoto2. I only got it to work partially. If you can get it to work fully, let me know.
At this stage, I have libptp working almost completely with only a few
glitches with stopping video. If you get it to work fully, send me a note.
I’ll take another look at it in the future.
4.8. Troubleshooting the USB connection
4.8.1. Could not open session
unmount the camera.
craig@linux-silver:~$ ptpcam -i
Camera information
==================
ERROR: Could not open session!
After you unmount the camera, you will see this:
craig@linux-silver:~$ ptpcam -i
Camera information
==================
Model: RICOH THETA S
  manufacturer: Ricoh Company, Ltd.
  serial number: '00010093'
  device version: 01.42
  extension ID: 0x00000006
  extension description: (null)
  extension version: 0x006e
4.9. Simple USB Control of Camera with Python
Using the Python subprocess module, you can simply run ptpcam inside
of your Python program and control the control without having to deal with
the raw PTP codes.
The example below does the following:
-
takes a picture
-
gets camera info and manipulates it inside the Python program
-
gets list of files on camera and snips off the handle for the last image taken
-
downloads the last image to local disk
import subprocess
## example of taking a picture
def takePicture():
    subprocess.call("ptpcam -c", shell=True)
takePicture()
# example of grabbing device info and using it in your python program.
ptpinfo = subprocess.Popen(["ptpcam", "--info"], stdout=subprocess.PIPE)
# although this simply prints to stdout, you can parse
# the response for your program
for line in ptpinfo.stdout.readlines():
    print(line.rstrip())
# find the last picture taken. Modify to parse for date or other files = [] listFiles = subprocess.Popen(["ptpcam", "-L"], stdout=subprocess.PIPE) for line in listFiles.stdout.readlines(): files.append(line.rstrip()) lastLine = files[len(files) - 2].split(" ") lastPicture = lastLine[0][:-1]print("The handle for the last picture taken is " + lastPicture)# download the picture ptpcommand = "ptpcam --get-file=" + lastPicture
subprocess.call(ptpcommand, shell=True)
I’ve saved the file as pyptp.py
$ python pyptp.py
Camera information
==================
Model: RICOH THETA S
  manufacturer: Ricoh Company, Ltd.
  serial number: '00010093'
  device version: 01.42
  extension ID: 0x00000006
  extension description: (null)
  extension version: 0x006e
The handle for the last picture taken is 0x00640284
Camera: RICOH THETA S
Saving file: "R0010644.JPG" is done.
5. Tips
-
You can’t access the WiFi API if your camera is plugged into your computer. Plug your camera into a 1,500 mA power source that is plugged into a wall.
-
The THETA can connect to only one device at a time. It can connect to a phone or a computer, but not at the same time. If you have dual network interfaces, you can connect to the Internet and the THETA at the same time. You may need to adjust your routes.
-
If there are multiple THETAs at an event (like a hackathon) the SSID access points will look the same. Make sure you connect to the right THETA. Your access point contains the serial number on your THETA.
-
By default, the WiFi password for the THETA S is the last eight digits of the serial number. The serial number is in the WiFi SSID as well as on the bottom of the camera.
-
You can’t change
captureModeoption to_liveStreamingwith the API. Live streaming does work manually. You can change capture mode toimageor_videowith the API. -
Live streaming won’t work over WiFi. Live Preview mode will work at lower resolution and lower framerates. See the Unofficial Media Guide for video specifications.
-
There is a GitHub Repository of example code from the community.
-
The WiFi signal is not strong. Test the distance and signal strength before you build your app. I suggest you test a file download at different distances so you can get a sense for how the distance affects transfer speeds.
5.1. Network
If you’re connected to the THETA with WiFi, how do you connect to the Internet at the same time?
5.1.1. Desktop and Development Environment
The THETA S is always at 192.168.1.1. You can’t change the IP address.
In my primary test environment, my Internet router from ATT is
192.168.1.254. Thus, I can connect to the THETA with a USB WiFi
adapter and to the Internet with Ethernet.
| If your WiFi router is at 192.168.1.1, then you will need to change it. |
If you don’t know the IP address of your gateway, you can use ipconfig
on Windows or ifconfig on Linux.
This is what I see on Windows:
C:\Users\Craig>ipconfig
Windows IP Configuration
Ethernet adapter Ethernet:
   Connection-specific DNS Suffix  . : attlocal.net
   IPv4 Address. . . . . . . . . . . : 192.168.1.64
   Subnet Mask . . . . . . . . . . . : 255.255.255.0
   Default Gateway . . . . . . . . . : 192.168.1.254
I actually have more IPv6 info, but as we’re not using IPv6 addresses in this example, I just included the IPv4 (192.x.x.x) information.
On Windows, the connection from the desktop Windows machine to the THETA looks like this:
Wireless LAN adapter Wi-Fi:
   Connection-specific DNS Suffix  . :
   IPv4 Address. . . . . . . . . . . : 192.168.1.5
   Subnet Mask . . . . . . . . . . . : 255.255.255.0
   Default Gateway . . . . . . . . . : 192.168.1.1
I am using a cheap WiFi adapter that I got on Amazon for $10. I originally bought it for my Raspberry Pi, but it works great on Windows 10 and the connection to the THETA is solid. I have the WiFi adapter less than a foot from my THETA for testing. There are many WiFi adapters at the $10 price point. If you’re going to develop apps for the THETA, it’s a good investment.
From the Windows 10 machine, I can connect to both the THETA and the Internet. If I power the THETA from a 1.5A power source such as a portable battery or wall socket, I can test the THETA for long periods.
As I normally work within a Linux VirtualBox VM running on a Windows 10 host, I set the VirtualBox Network Adapter with a single NAT adapter. With this configuration, I can access both the Internet and the THETA from within the guest VM.
Inside of the Linux VM, I am getting good Internet access to GitHub over the
Internet and to the THETA, which I can test using curl.
ricoh@odapolis: $ ping theta360developers.github.io
PING github.map.fastly.net (185.31.19.133) 56(84) bytes of data.
64 bytes from 185.31.19.133: icmp_seq=1 ttl=52 time=161 ms
64 bytes from 185.31.19.133: icmp_seq=2 ttl=52 time=161 ms
^C
--- github.map.fastly.net ping statistics ---
2 packets transmitted, 2 received, 0% packet loss, time 1001ms
rtt min/avg/max/mdev = 161.515/161.688/161.862/0.437 ms
ricoh@odapolis: $ curl http://192.168.1.1/osc/info
{"manufacturer":"RICOH","model":"RICOH THETA S","serialNumber":"00001221",
"firmwareVersion":"01.30",
"supportUrl":"https://theta360.com/en/support/",
"endpoints":{"httpPort":80,"httpUpdatesPort":80},
"gps":false,"gyro":false,"uptime":226,
"api":["/osc/info",
"/osc/state",
"/osc/checkForUpdates",
"/osc/commands/execute",
"/osc/commands/status"]}
5.1.2. Mobile Phone
You need to manually change the WiFi connection. If you’re using Android, we’ve heard that you can use your application to change the WiFi connection from the phone to the Internet. Here’s a discussion on StackOverflow about this. I have not tried to implement anything myself. If you build an application that switches the WiFi connection from the THETA to the Internet, send me a code snippet and I’ll put it in our repository.
5.1.3. Raspberry Pi and Windows Tablet
If you’d like to build a standalone hardware device to give to real estate agents or used car marketers, you can put two Wifi adapters on Raspberry Pi or plug a WiFi adapter into the USB port of your tablet.
This is a picture of a self-contained Raspberry Pi unit powered by a rechargeable battery.

The Raspberry Pi is completely portable and can connect to the Internet and the THETA at the same time. The interface is a touchscreen.
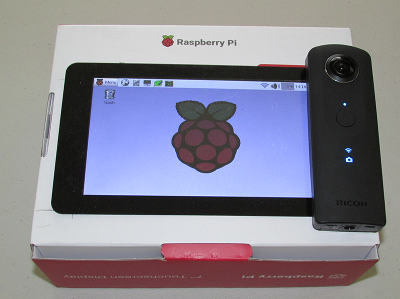
This is an updated version of the system with a RPi touch interface built with Pygame.
6. Resources
6.1. Official Information
6.2. Unofficial Information
-
THETA Unofficial Guide - Articles, guides, and tutorials from the community
7. Appendix
7.1. Python Desktop
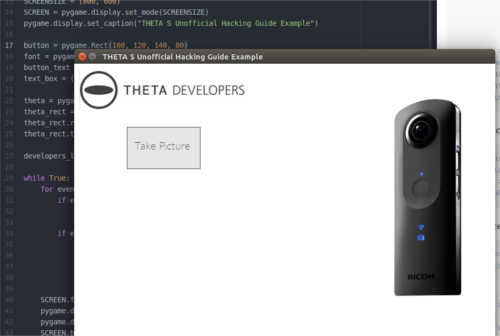
This example uses the same Python code from the previous command line example and runs it from a GUI. The example uses Pygame due to the ease with which a GUI can be built. The application can also be modified to run on Android phones. The source code is available on GitHub.
Modify the code in the previous example to allow running as a library.
  1
2

    if __name__ == '__main__':
      main()
The previous code is called thetaPythonTest.py and is in the same directory
as my new program. The full program has two graphics purely for decoration.
You don’t need those portions and can ignore them.
| I’ve changed the library name to thetapylib.py, but I have not updated the code example below. Suggest you look at pyTHETA.py command line tool. The older test library thetaPythonTest.py should still be there and work. deskTHETA.py now has more examples to start and stop video capture. I’ll try and get some of the file listing and transfer commands working with the GUI prior to the Hackathon, but we’re in crunch time. |
7.1.1. Full Program
  1
2
3
4
5
6
7
8
9
10
11
12
13
14
15
16
17
18
19
20
21
22
23
24
25
26
27
28
29
30
31
32
33
34
35
36
37
38
39
40
41
42
43
44
45

    import pygame, sys
  import requests
  import json
  from thetaPythonTest import startSession, takePicture

  WHITE = (255,255,255)
  GRAY = (230, 230, 230)
  GREEN = (100, 200, 50)
  DARK = (64, 64, 64)

  pygame.init()
  SCREENSIZE = (800, 600)
  SCREEN = pygame.display.set_mode(SCREENSIZE)

  button = pygame.Rect(100, 120, 140, 80)
  font = pygame.font.Font("fnt/Lato-Thin.ttf", 20)
  button_text = font.render("Take Picture", True, DARK)
  text_box = (button.left + 15, button.top + 23)

  theta = pygame.image.load("img/ricoh-theta-s.png")
  theta_rect = theta.get_rect()
  theta_rect.right = SCREENSIZE[0] - 50
  theta_rect.top = 60

  developers_logo = pygame.image.load("img/theta_developers.png")

  while True:
      for event in pygame.event.get():
          if event.type == pygame.QUIT:
              pygame.quit()
              sys.exit()
          if event.type == pygame.MOUSEBUTTONDOWN:
              mouse_pos = pygame.mouse.get_pos()
              if button.collidepoint(mouse_pos):
                  sid = startSession()
                  takePicture(sid)

      SCREEN.fill(WHITE)
      pygame.draw.rect(SCREEN,GRAY, button)
      pygame.draw.rect(SCREEN, DARK, button, 1)
      SCREEN.blit(button_text, text_box)
      SCREEN.blit(theta, theta_rect)
      SCREEN.blit(developers_logo, (10, 10))

      pygame.display.update()
7.1.2. Code Walkthrough
Import the pygame and sys libraries and set up a blank window.
  import pygame, sys

  pygame.init()
  SCREENSIZE = (800, 600)
  SCREEN = pygame.display.set_mode(SCREENSIZE)

  while True:
      for event in pygame.event.get():
          if event.type == pygame.QUIT:
              pygame.quit()
              sys.exit()
      pygame.display.update()
Load your fonts and colors above the main while loop.
  WHITE = (255,255,255)
  GRAY = (230, 230, 230)
  GREEN = (100, 200, 50)
  DARK = (64, 64, 64)
  font = pygame.font.Font("fnt/Lato-Thin.ttf", 20)
Build the button to press to take a picture. This code also goes above
the main while loop.
  button = pygame.Rect(100, 120, 140, 80)
  button_text = font.render("Take Picture", True, DARK)
  text_box = (button.left + 15, button.top + 23)
Import your previous functions, close to the top of your program.
from thetaPythonTest import startSession, takePictureDraw the button inside of the main while loop above the display.update
statement.
  SCREEN.fill(WHITE)
  pygame.draw.rect(SCREEN,GRAY, button)
  pygame.draw.rect(SCREEN, DARK, button, 1)
  SCREEN.blit(button_text, text_box)
In the event queue loop, check for a button press. If there is a button
press, then start a new camera session and take the picture. The button press is
detected by first checking for an event MOUSEBUTTONDOWN. If the mouse or
touchscreen is down, then get the position of the mouse or finger. If the
point of the mouse is inside of the button, then take the picture.
  if event.type == pygame.MOUSEBUTTONDOWN:
      mouse_pos = pygame.mouse.get_pos()
      if button.collidepoint(mouse_pos):
          sid = startSession()
          takePicture(sid)
7.2. thetapylib
The sample Python library is included purely as an example of some of the core commands that the THETA API v2 provides. It is not intended for use in applications.
Documentation is included below so that you can quickly get an overview of using some of the commands before you build your own library.
thetapylib
/home/ricoh/Development/viewer/thetapylib.py
Example library for RICOH THETA S hacking with Python.  The new
API is compliant with the Open Spherical Camera specification.
This is intended to show how the THETA S API works.  It is
not intended for use in your program.  There is no error
checking and this example library only handles a handful
of commands.
There are three example programs that use this library.
At the top of your Python script, use
from thetapylib import *
After you import the library, you can use the commands like this:
state()
That will return the state of the camera, which is great to
get the sessionId.
You can also get the sessionId when you start a new session:
startSession()
In fact, the startSession() function will return the
sessionId.
Example use of the library with Pygame to detect the
button press.
if event.type == pygame.MOUSEBUTTONDOWN:
    mouse_pos = pygame.mouse.get_pos()
    if pictureButton.collidepoint(mouse_pos):
        sid = startSession()
        takePicture(sid)
    if captureStartButton.collidepoint(mouse_pos):
        sid = startSession()
        startCapture(sid)
    if captureStopButton.collidepoint(mouse_pos):
        stopCapture(sid)
Example use of library from the command line:
if sys.argv[1] == "startCapture":
    if len(sys.argv) < 3:
        print("Usage: pyTHETA.py startCapture SID_000X")
        print("Use 'state' to get sessionId")
    else:
        sid = sys.argv[2]
        response = startCapture(sid)
        pprint.pprint(response)
elif sys.argv[1] == "stopCapture":
    if len(sys.argv) < 3:
        print("Usage: pyTHETA.py stopCapture SID_000X")
        print("Use 'state' to get sessionId")
    else:
        sid = sys.argv[2]
        response = stopCapture(sid)
        pprint.pprint(response)
Functions
getImage(fileUri, imageType='image')
    Transfer the file from the camera to computer and save the
    binary data to local storage.  This works, but is clunky.
    There are easier ways to do this. The __type parameter
    can be set to "thumb" for a thumbnail or "image" for the
    full-size image.  The default is "image".
info()
    Get basic information ont he camera.  Note that this is a GET call
    and not a POST.  Most of the calls are POST.
latestFileUri()
    This will only work if you've just taken a picture.  The state
    will include the attribute latestFileUri.  You need this to
    transfer the file from the camera to your computer or phone.
listAll(entryCount=3, detail=False, sortType='newest')
    entryCount:
            Integer     No. of still images and video files
                        to be acquired
    detail:
            Boolean     (Optional)  Whether or not file details are
                        acquired true is acquired by default.
                        Only values that can be acquired
                        when false is specified are "name", "uri",
                        "size" and "dateTime"
    sort:
            String      (Optional) Specify the sort order
                        newest (dateTime descending order)/ oldest
                        (dateTime ascending order)
                        Default is newest
request(url_request)
    Generate the URI to send to the THETA S.  The THETA IP address is
    192.168.1.1
    All calls start with /osc/
startCapture(sid)
    Begin video capture if the captureMode is _video.  If the
    captureMode is set to image, the camera will take multiple
    still images.  The captureMode can be set in the options.
    Note that this will not work with streaming video using the
    HDMI or USB cable.
startSession()
    Start a new session.  Grab the sessionId number and
    return it.
    You'll need the sessionId to take a video or image.
state()
    Get the state of the camera, which will include the sessionsId and also the
    latestFileUri if you've just taken a picture.
stopCapture(sid)
    Stop video capture.  If in image mode, will stop
    automatic image taking.
takePicture(sid)
    Take a still image.  The sessionId is either taken from
    startSession or from state.  You can change the mode
    from video to image with captureMode in the options.
7.3. Python File Transfer
Here’s an example of getting the file from the camera to a computer
or Android phone. There’s easier ways to get the file from the camera,
but this method works with the requests library.
There are two main parts. First grab the latest file URI from the
camera. The second part is to transfer the file over and save it to
output.jpg
Set up the URL base.
def request(url_request):
    url_base = "http://192.168.1.1/osc/"
    url = url_base + url_request
    return url
Grab the state information from the camera.
def state():
    url = request("state")
    req = requests.post(url)
    response = req.json()
    return response
Assuming that you’ve just taken a picture, the camera will have the
attribute _latestFileUri. If you haven’t taken a picture in
the session, take a picture now for this test.
def latestFileUri():
    state_data = state()["state"]
    latestFileUri = state_data["_latestFileUri"]
    return latestFileUri
Once you know the URI, you can grab the file and write it to your local storage.
def getImage(fileUri):
    url = request("commands/execute")
    body = json.dumps({"name": "camera.getImage",
         "parameters": {
            "fileUri": fileUri,
#            "_type": "thumb"
            "_type": "image"
         }
         })
    with open('output.jpg', 'wb') as handle:
        response = requests.post(url, data=body, stream=True)
        for block in response.iter_content(1024):
            handle.write(block)
7.3.1. Other Command Line Python Tools
-
Python script downloader from Ulrich Rossgoderer. Community.